Add a Home Printer to a Chromebook
ⓘ
Not all home printers are compatible with Chromebooks.
Scroll down for instructions in Spanish, Russian, Chinese and Vietnamese.
Summary: This article provides instructions on how to add a home printer to your Chromebook.
Note1: These steps are under the assumption that the network printer is already set up and configured on the home network. Or that the printer is connected to the Chromebook directly with a USB cable.
Note 2: Not all home printers are compatible with Chromebooks.
- To install a USB printer, Sign into the chromebook, then connect the printer with a USB cable. Now skip to Step 11.
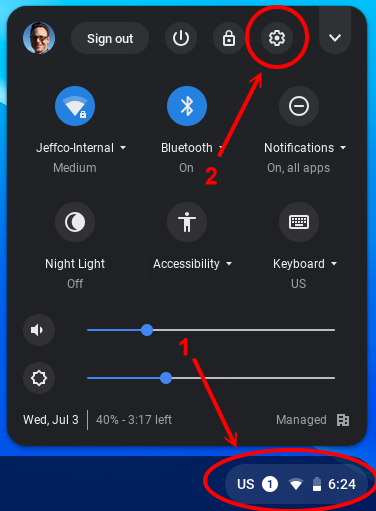
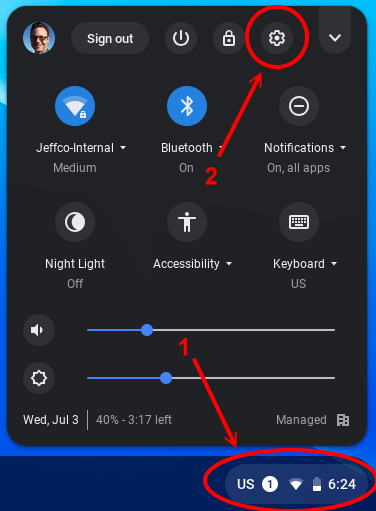
- To install a Network printer, Sign into the chromebook, click on the menu box in the bottom right corner of the screen (Where the time and battery indicators are located).
- Next click the gear icon(settings) in the top right corner of the pop up menu.
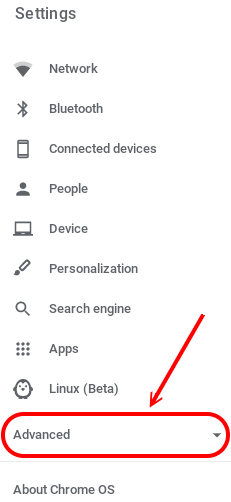
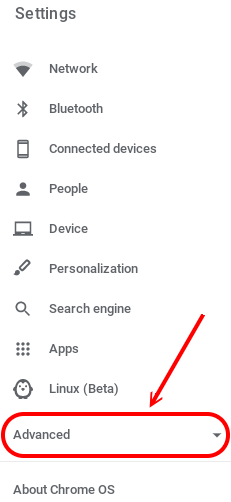
- A new window will open with chromebook settings. On the left bar of this window find and expand the "Advanced" settings
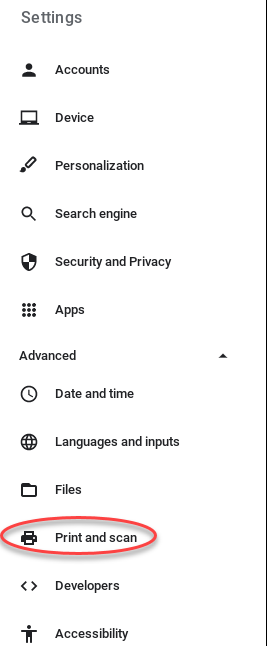
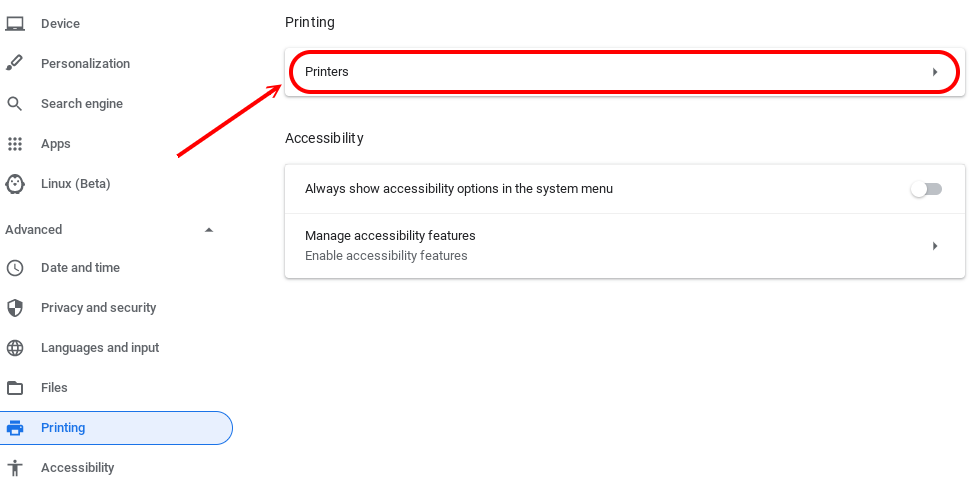
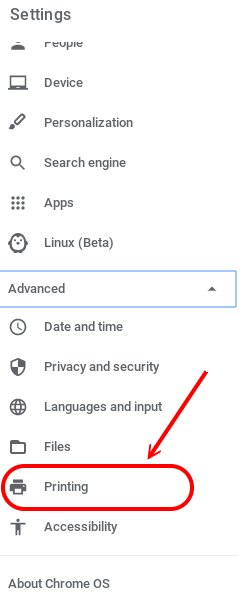
- Next click on the “Print and scan” option under the Advanced section.
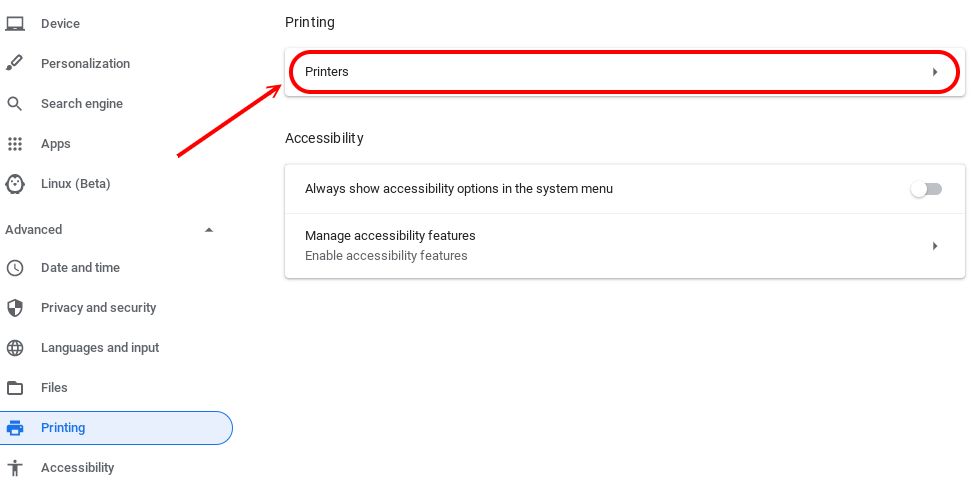
- Next click on the “Printers” option in the right pane of the window.
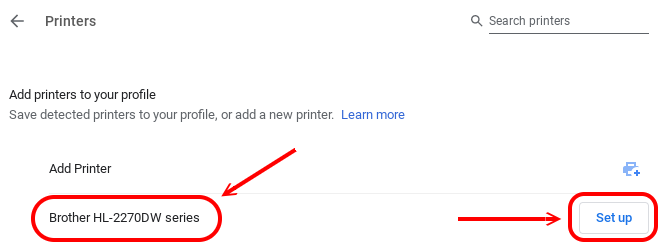
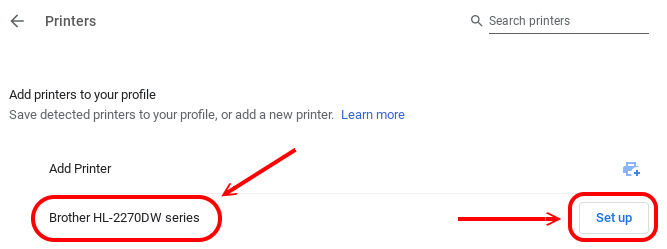
- You should see your home printer listed under the “Add Printer” section. Click on the “Set up” button to the right of your home printer.
Note: If you do not see your printer listed, it is either not set up on the network, not connected with a USB cable, or not compatible with your chromebook.
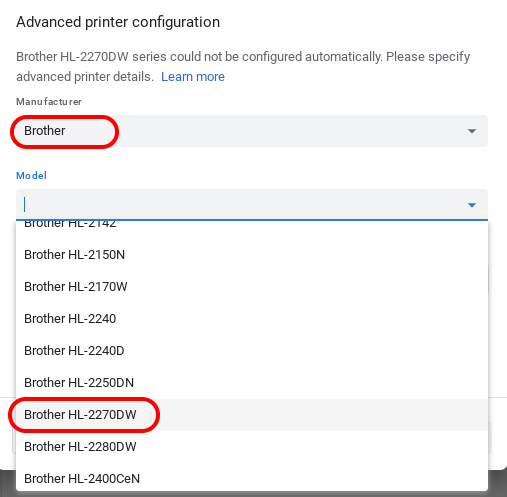
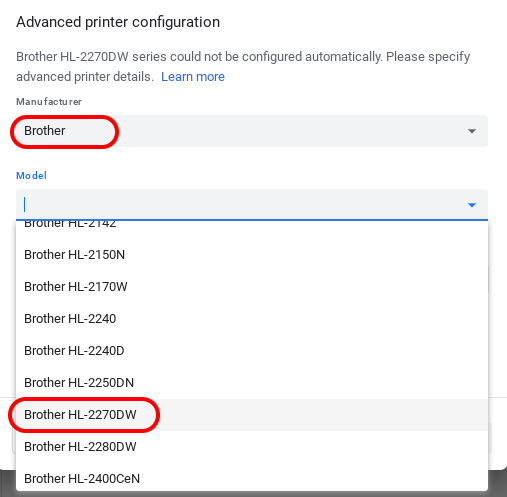
- On the next window, use the “Manufacturer” and “Model” pulldown menus to select the brand and model of your home printer.
Note: If you are not sure, check the name of the printer on one of your home computers, or on the printer itself. The following printer is an example only.
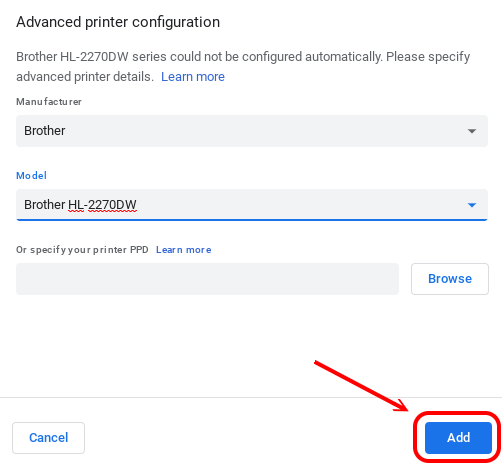
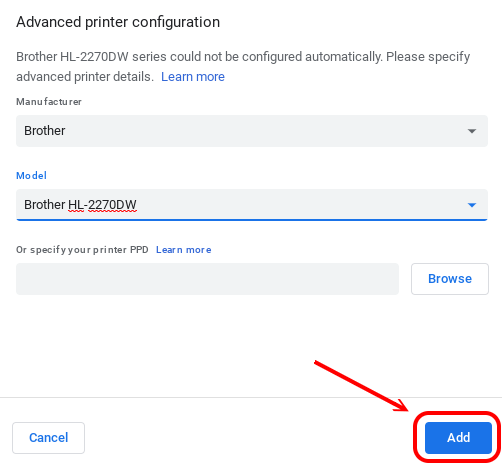
- Next click on the “Add” button at the bottom of the window to add the printer to your chromebook.
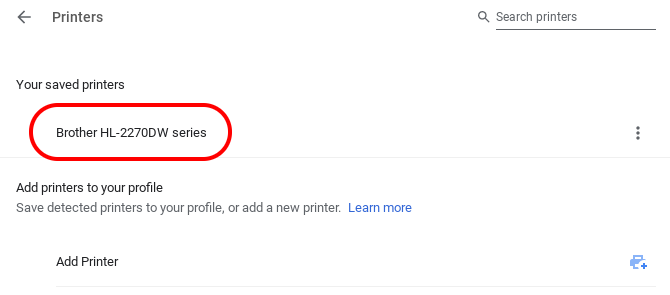
- You should now see your home printer listed under the “Your saved printers” section. Close the settings menu.
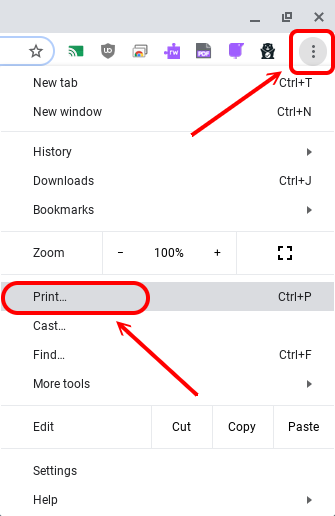
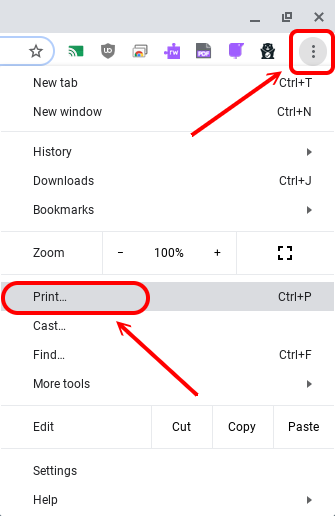
- Next open your Chrome browser and click on the 3 dots in the top right corner. Then select “Print...”.
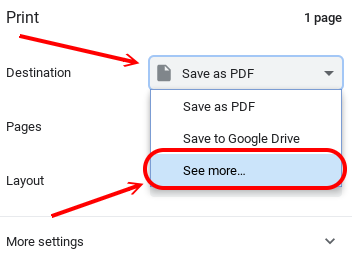
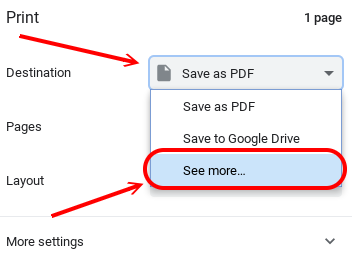
- In the “Destination” pulldown menu, click on “See more…”.
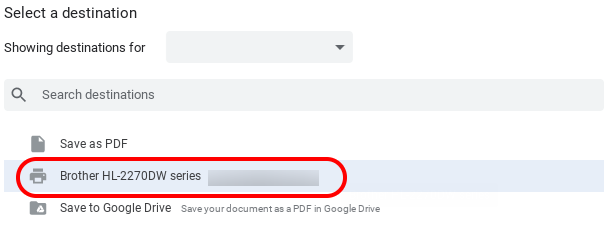
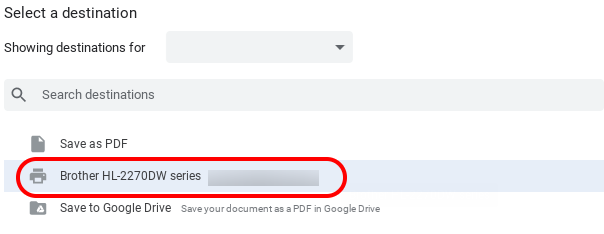
- Now identify your printer, and click on it to add it to the destination list.
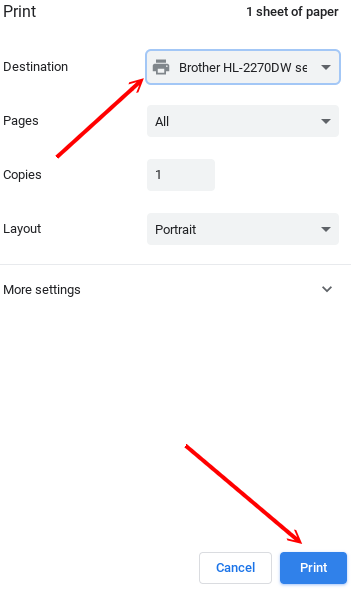
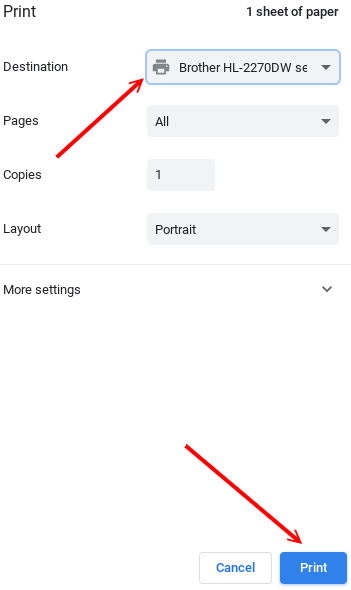
- You will be taken back to the primary print screen where you should now see the printer listed. Select the “Print” button to print to your printer. You can now print at home!
Still need help? Click here to submit a ticket!
(Russian) Как добавить домашний принтер к Chromebook
Примечание 1: Эти действия предполагают, что сетевой принтер уже установлен и настроен в домашней сети. Или что принтер подключен к устройству Chromebook напрямую с помощью кабеля USB.
Примечание 2: Не все домашние принтеры совместимы с устройствами Chromebook.
- Чтобы установить USB-принтер, войдите в Chromebook, затем подключите принтер с помощью USB-кабеля. Теперь перейдите к действию 11.
- Чтобы установить сетевой принтер, войдите в Chromebook, щелкните поле меню в правом нижнем углу экрана (где расположены индикаторы времени и заряда батареи).
- Затем щелкните значок шестеренки (настройки) в правом верхнем углу всплывающего меню.
- Откроется новое окно с настройками Chromebook. На левой панели этого окна найдите и разверните настройки «Дополнительно» (Advanced)
- Затем нажмите на опцию «Печать» (Printing) в разделе «Дополнительно» (Advanced).
- Затем нажмите на опцию «Принтеры» (Printers) на правой панели окна.
- Вы должны увидеть свой домашний принтер в разделе «Добавить принтер» (Add Printer). Нажмите кнопку «Настроить» (Set up) справа от домашнего принтера.
Примечание: Если вы не видите свой принтер в списке, он либо не настроен в сети, не подключен с помощью кабеля USB, либо несовместим с вашим Chromebook.
- В следующем окне в раскрывающемся меню используйте «Производитель» (Manufacturer) и «Модель» (Model), чтобы выбрать марку и модель вашего домашнего принтера.
Примечание: Если вы не уверены, проверьте название принтера на одном из ваших домашних компьютеров или на самом принтере. Следующий принтер приведен только в качестве примера.
- Затем нажмите кнопку «Добавить» (Add) в нижней части окна, чтобы добавить принтер в Chromebook.
- Теперь вы должны увидеть свой домашний принтер в разделе «Сохраненные принтеры» (Your saved printers). Закройте меню настроек.
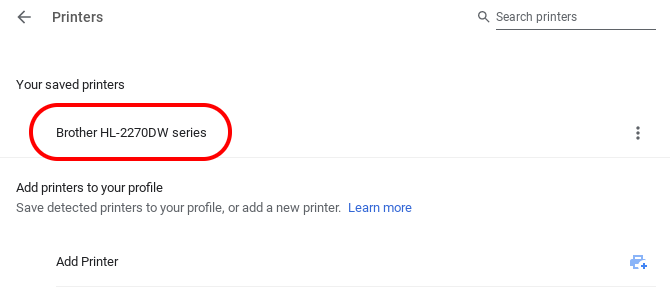
- Затем откройте браузер Chrome и нажмите на 3 точки в правом верхнем углу. Затем выберите «Печать ...» (Print...).
- В раскрывающемся меню «Место назначения» (Destination) нажмите «Подробнее…» (See more…).
- Теперь определите свой принтер и щелкните по нему, чтобы добавить его в список адресатов.
- Вы вернетесь к основному экрану печати, где теперь должны увидеть принтер в списке. Нажмите кнопку «Печать» (Print) для печати на принтере. Теперь вы можете печатать дома!
